

Multithreads
Создание низкоуровневого потока в swift
var thread = pthread_t(bitPattern: 0)
        var attr = pthread_attr_t()
        pthread_attr_init(&attr)

        callbacks = [ {

            }
        ]

        pthread_create(&thread, &attr, { pointer in
            print("test")
            return nil

        }, nil)
Создание глобальной очереди
DispatchQueue.global(qos: DispatchQoS.QoSClass.userInitiated).async {
            self.workTask() {
                self.printResult()
            }
        }
Push Notifications

Оглавление
- получаем токен устройства
- генерация фалов из сертификатов
- настраиваем серверную часть (PHP)
- меняем звук уведомления по умолчанию
- удаляем бейджи
APNS — Apple Push Notification Service
1. получить токен устройства
для этого в файл AppDelegate.swift добавляем два метода
func application(_ application: UIApplication, didFinishLaunchingWithOptions launchOptions: [UIApplicationLaunchOptionsKey: Any]?) -> Bool {
        // Override point for customization after application launch.
        let notifyCenter = UNUserNotificationCenter.current()
        notifyCenter.delegate = self
        notifyCenter.requestAuthorization(options: [.sound, .alert, .badge]){ (granted, error) in
            print("ok: \(granted)")
            print("err: \(error)")
        }
        application.registerForRemoteNotifications()
        return true
    }

func application(_ application: UIApplication, didRegisterForRemoteNotificationsWithDeviceToken deviceToken: Data) {

        let token = PushNotifyHelper.getTokenFromDeviceToken(deviceToken)
        print("Registration device token: \(token)")
    }
func userNotificationCenter(_ center: UNUserNotificationCenter, willPresent notification: UNNotification, withCompletionHandler completionHandler: @escaping (UNNotificationPresentationOptions) -> Void) {
        print("Handle push from foreground")
        // custom code to handle push while app is in the foreground
        print("\(notification.request.content.userInfo)")
    }

    func userNotificationCenter(_ center: UNUserNotificationCenter, didReceive response: UNNotificationResponse, withCompletionHandler completionHandler: @escaping () -> Void) {
        print("Handle push from background or closed")
        // if you set a member variable in didReceiveRemoteNotification, you  will know if this is from closed or background
        print("\(response.notification.request.content.userInfo)")
    }
PushNotifyHelper
import UserNotifications

class PushNotifyHelper {

    class func getTokenFromDeviceToken(_ deviceToken: Data) -> String{
        var token = ""
        for i in 0..<deviceToken.count {
            token = token + String(format: "%02.2hhx", arguments: [deviceToken[i]])
        }
        return token
    }
}
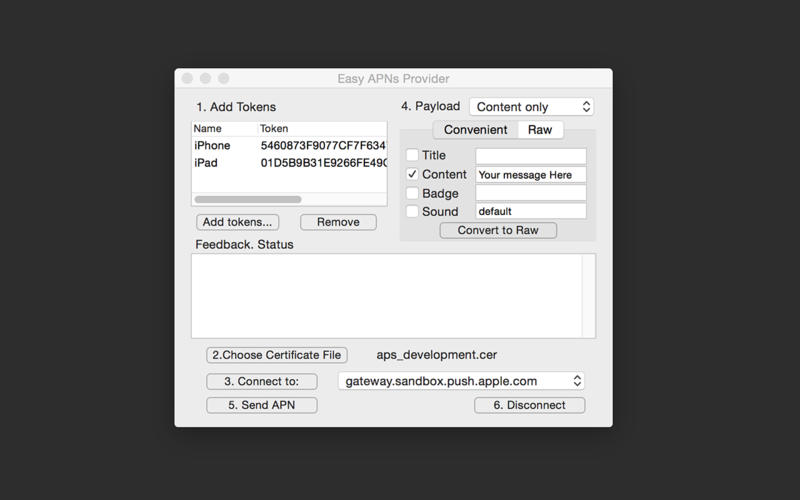
3. Настраиваем серверную часть (PHP)
$deviceToken = "0000000000000000000000000000000000000000000000000";

class PushSender{
    static public function run($deviceToken){
        $certificateFile = "push.pem";
        $certificateString = file_get_contents('push.pem');
        $port = 2195;
        $host = "gateway.sandbox.push.apple.com";
        $address = "ssl://{$host}:{$port}";


        $title = "title";
        $message = "Privet";
        $arMessage = array(
            'aps' => array(
                'alert' => array(
                    'title' => $title,
                    'body' => $message,
                ),
                'url-args' => array(
                    '',
                ),
                'sound'=>'default'
            ),
        );

        $error = 0;
        $errorString = "";
        $context =   $streamContext = stream_context_create();
        $path = tempnam(sys_get_temp_dir(), 'cert_');
        file_put_contents($path, $certificateString);
        stream_context_set_option($streamContext, 'ssl', 'local_cert',  $path);

        $client = @stream_socket_client(
            $address,
            $error,
            $errorString,
            2,
            STREAM_CLIENT_CONNECT,
            $context
        );

        $encodedPayload = json_encode($arMessage);
        $binaryData = chr(0).
            chr(0).
            chr(32).
            pack('H*', $deviceToken).
            chr(0).chr(strlen($encodedPayload)).
            $encodedPayload;

        fwrite($client, $binaryData);
        fclose($client);


    }
}

PushSender::run($deviceToken);
для примера я сделал анти-рефакторинг и объединил несколько разных классов в один метод нарушив сразу несколько парадигм ООП. но сделал это чтобы не размазывать код, а попытаться наглядно показать объём который нужен для отправки уведомлений с сервера на iOS устройства.
5. удаляем бейджи )
UIApplication.shared.applicationIconBadgeNumber = 0;
Ссылки:
Замена наследования делегированием
Проблема
У вас есть подкласс, который использует только часть методов суперкласса или не хочет наследовать его данные.
Решение
Создайте поле и поместите в него объект суперкласса, делегируйте выполнение методов объекту-суперклассу, уберите наследование.
Достоинства
Класс не содержит лишних методов, которые достались ему в наследство от суперкласса.
В поле-делегат можно подставлять разные объекты, имеющие различные реализации функциональности. По сути, вы получаете реализацию паттерна проектирования Стратегия.
Посчитать кол-во файлов в папке
Посчитать кол-во файлов в папке
ls -f . | wc -l
Рефакторинг
тут прям Антология рефакторинга
кто-то большой молодец.
Чистый код содержит необходимый минимум классов и других движущихся частей.
Чем меньше кода, тем меньше его нужно держать в голове. Чем меньше кода, тем меньше вероятность его сломать.
Протоколы и Универсальные типы в swift
Пример:
Создаём протокол Alfa, c методами, которые реализуются через generics в дальнейшем
protocol Alfa {
    associatedtype Item
    func printItem(from item: Item)
    func make() -> Item
}
Пишем реализацию класса Betta, который поддерживает протокол Alfa
protocol Initalizable {
    init()
}

class Betta<Item: Initalizable>: Alfa {

    func printItem(from item: Item) {

        print("\(item)")
    }

    func make() -> Item {
        return Item()
    }

}
class Window: Initalizable {
    required init() {

    }

    var isOpened = false
    convenience init(_ opened: Bool) {
        self.init()
        isOpened = opened
    }
}

class CellWin: Initalizable {
    var name: String = ""
    required init() {

    }
}
Само использование и конфигурация класса Betta совершенно различными классами, но с общими протоколами
let item = Betta<CellWin>()
item.printItem(from: CellWin() )

let factory = Betta<Window>()
factory.printItem(from: Window(true))

let window = factory.make()
print("\(window)")
изменить цвет pdf картинки
чтобы изменить цвет pdf картинки(иконки) в свойствах Render As надо выставить template
tintColor
backgroundColor
UI Testing на нескольких устройствах сразу
UI Тестирование приложений

((https://github.com/linkedin/bluepill BluePill)
iOS: SwiftMonkey
Swift: Audio
проигрывать кастомный звук
import AVFoundation

/// example:
/// player = AudioHelper()
/// player.prepare("r2d2")
/// player.playSound()
class AudioHelper {
    private var player =  AVAudioPlayer()

    func prepare(name:String){


        let path = Bundle.main.path(forResource: name, ofType: "mp3")
        let url = URL(fileURLWithPath: path!)

        do {
            self.player =  try AVAudioPlayer(contentsOf: url)
            self.player.prepareToPlay()

        }
        catch{
            print("error plaing sound")
        }
    }

    func playSound() {
        player.play()
    }
}
let player = AudioHelper()
 player.prepare("r2d2")
player.playSound()
iOS: IBDesignable и IBInspectable
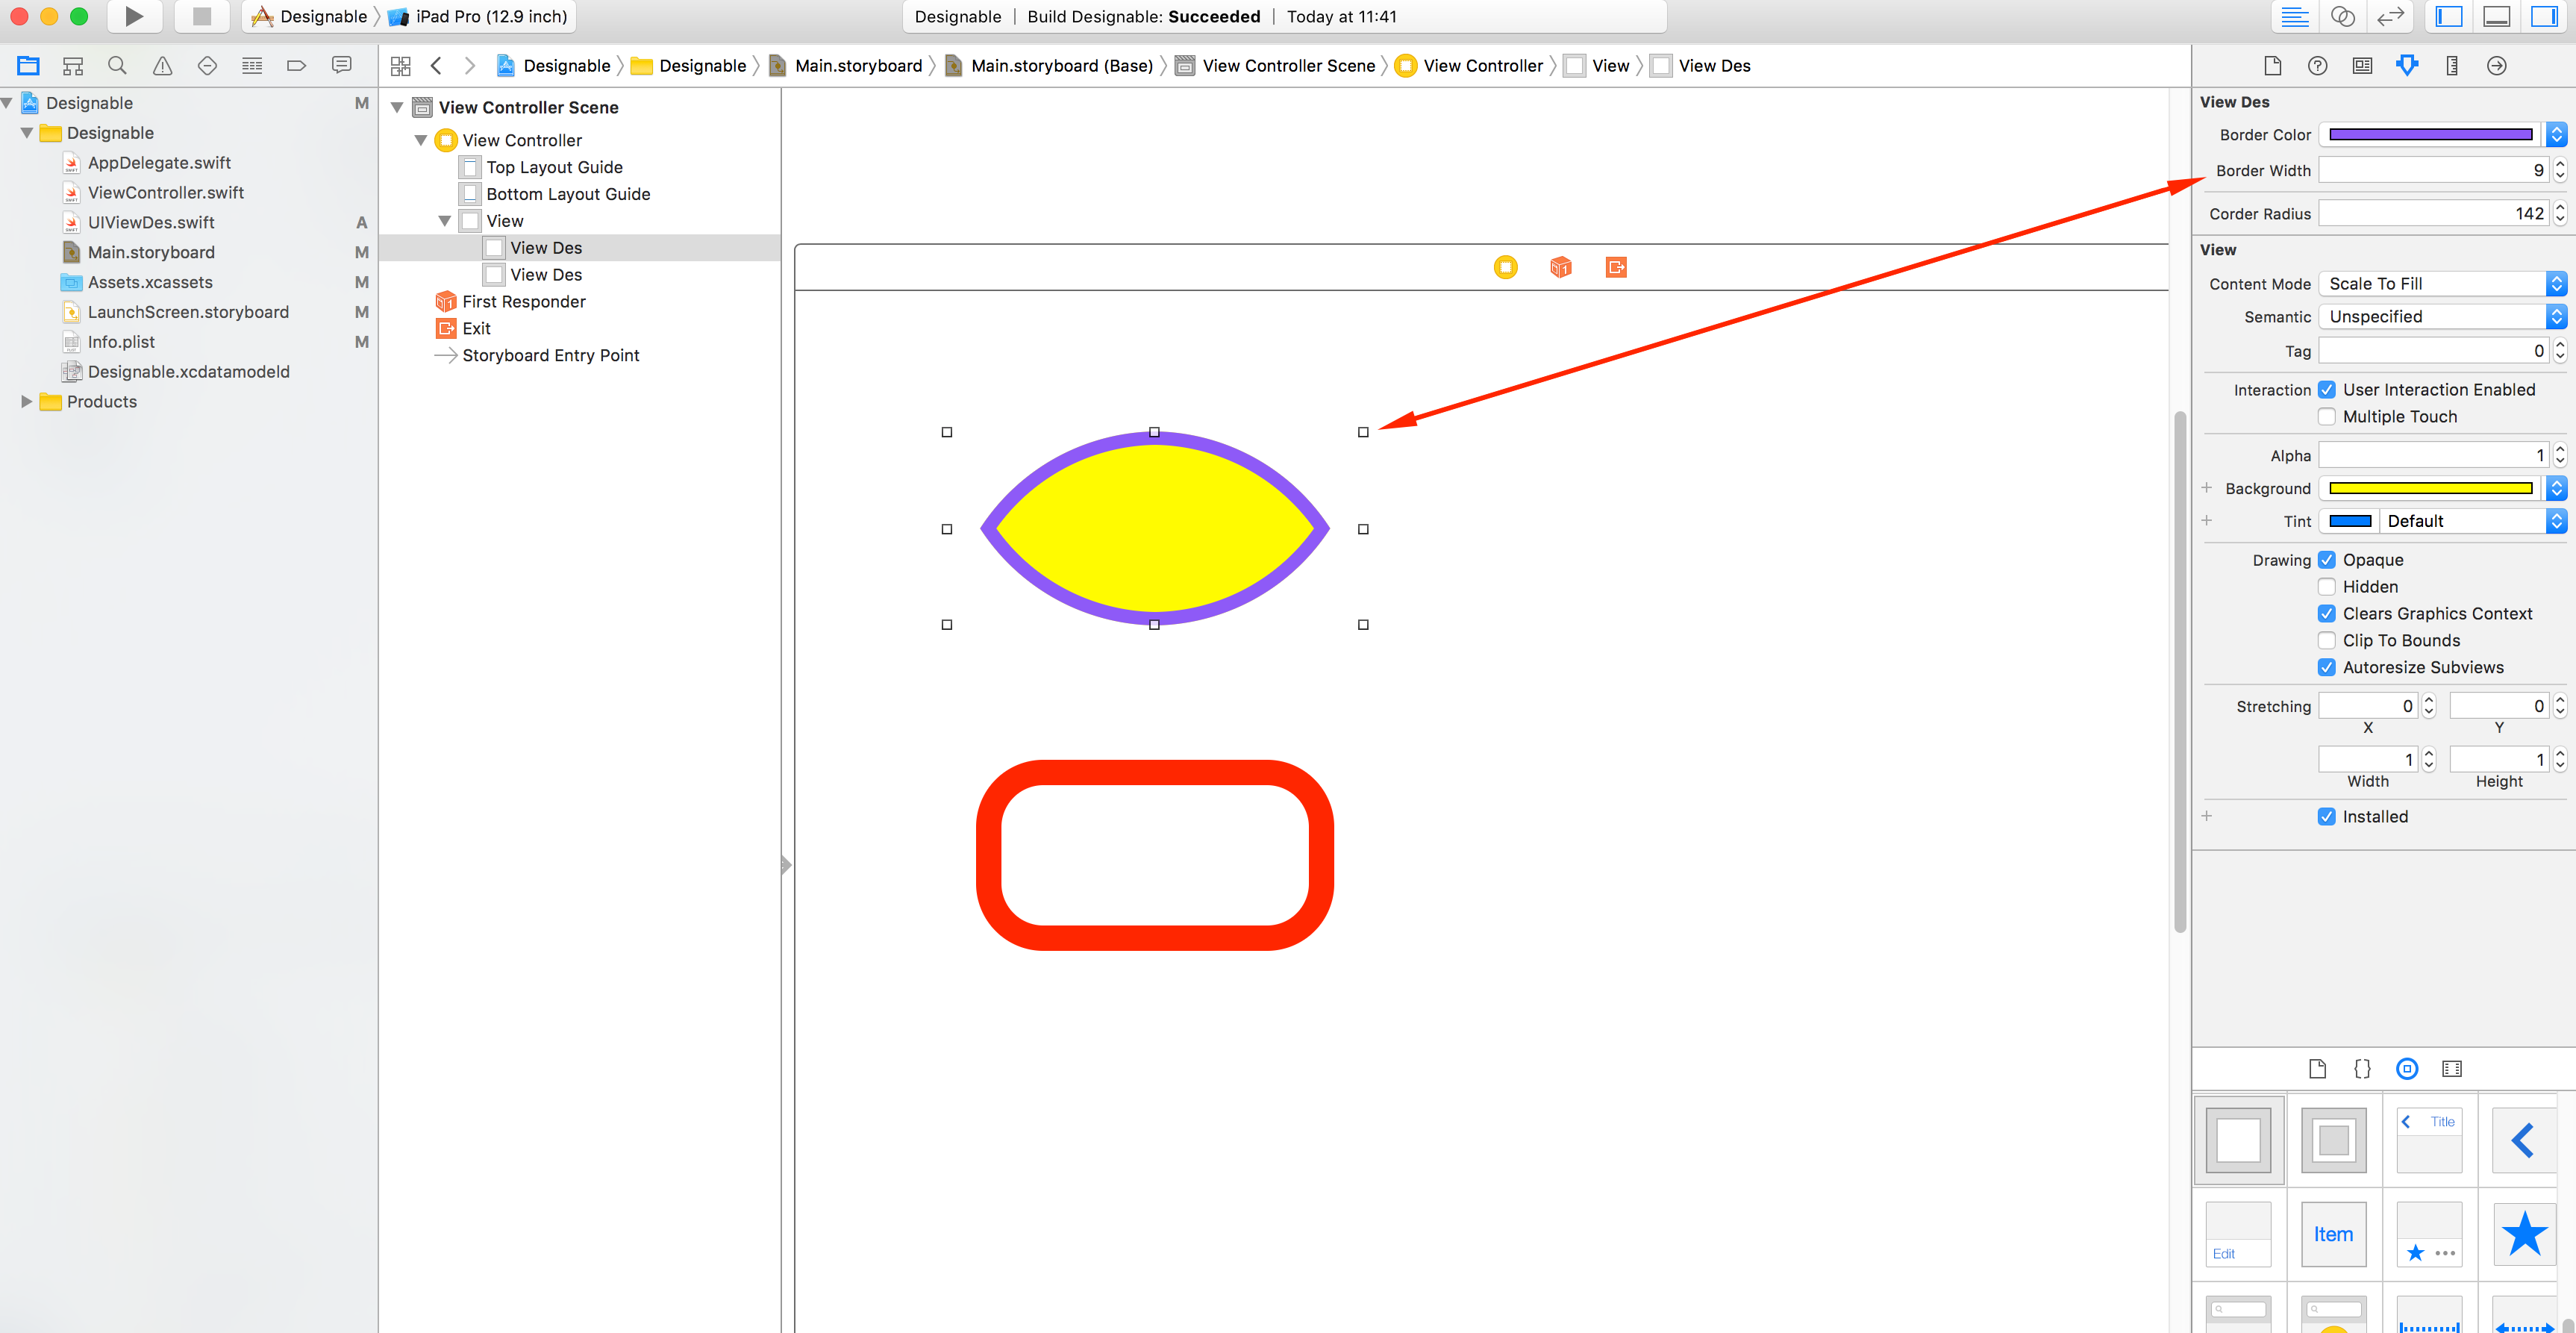
Пример класса
import UIKit

@IBDesignable class UIViewDes: UIView {
    @IBInspectable var borderColor: UIColor = UIColor.clear{
        didSet{
            layer.borderColor = borderColor.cgColor
        }
    }
    @IBInspectable var borderWidth:CGFloat = 1 {
        didSet{
            layer.borderWidth = borderWidth
        }
    }

    @IBInspectable var corderRadius: CGFloat = 0 {
        didSet{
            layer.cornerRadius = corderRadius
        }
    }

    override func awakeFromNib() {
        super.awakeFromNib()
    }
}
Swift: Работа с датой
как можно пользоваться датой в swift
// форматируем дату строку формата  "dd.mm.yyyy"
    func getDate() -> String{
        let formatter = DateFormatter()
        formatter.dateFormat = "dd.mm.yyyy"
        let date = formatter.string(from: dateEnd as Date)
        return date
    }
/// Хелпер для работы с датами
class DateHelper {

    /// преобразует строку вида YYYY-MM-DD -> NSDate
    ///
    /// - Parameter dateStr: строка формата  YYYY-MM-DD
    /// - Returns: NSDate
    class func dateFromString (dateStr: String) -> NSDate? {
        let dateFormatter = DateFormatter()
        dateFormatter.dateFormat = "yyyy-MM-dd"
        let date = dateFormatter.date(from: dateStr)
        return date as NSDate?
    }

    // форматируем дату строку формата  "dd.mm.yyyy"
    class func toString(date:Date, format:String) -> String{
        let formatter = DateFormatter()
        formatter.dateFormat = format
        let dateResult = formatter.string(from: date as Date)
        return dateResult
    }
}
ещё вариант в виде extension
extension Date {
    static func from(_ value: String) -> Date? {
        let dateFormatter = DateFormatter()

        // doc: http://userguide.icu-project.org/formatparse/datetime
        dateFormatter.dateFormat = "dd.MM.yyyy"
        if let newDate = dateFormatter.date(from: value) {
            return newDate
        }
        else { return nil }
    }


    // форматируем дату строку формата  "dd.mm.yyyy"
    func to(format:String) -> String {
        let formatter = DateFormatter()
        formatter.dateFormat = format
        let dateResult = formatter.string(from: self)
        return dateResult
    }
}
xcode: Создаём свой шаблон проекта для XCode
Создаём шаблон проекта на основе Single Application View
1 Шаг.
Идём в /Applications
правой кнопокой на приложении XCode и пункт Show Package Content
и заходим в папку Cmd+G ->
/Applications/Xcode.app/Contents/Developer/Platforms/iPhoneOS.platform/Developer/Library/Xcode/Templates/Project Templates/iOS/Application/
Копируем папку Single Application View и вставляем её по пути
~/Library/Developer/Xcode/Templates/[Templates group name]
Если вы это делаете в первый раз то папки Custom у вас нет и её надо создать
2 шаг. Меняем идентификатор шаблона в файле TemplateInfo.plist

! Теперь мы можем наполнить папку проекта своими исходниками и всё.
Шаблон проекта готов к использованию.
XCode: создаём свой шаблон исходника
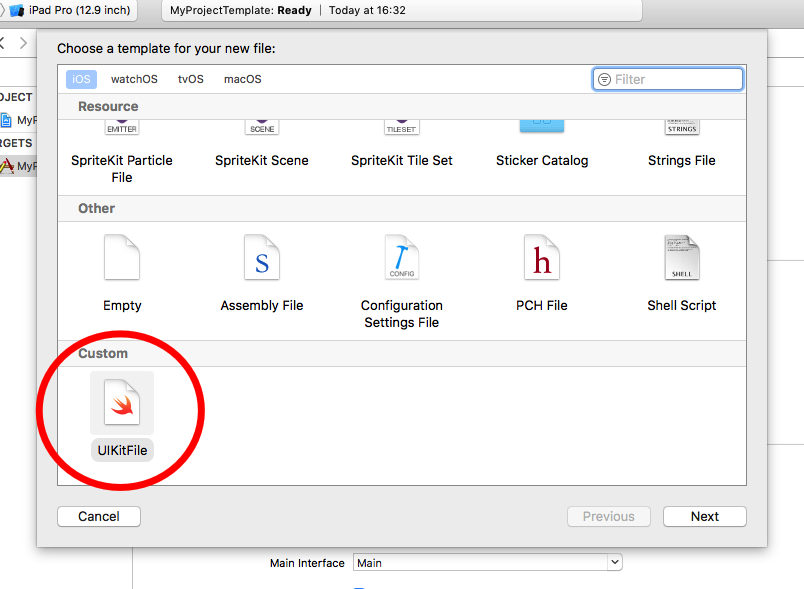
Создаём свой шаблон файла
1 шаг.
$ mkdir -p ~/Library/Developer/Xcode/Templates/[Group name]
$ cp -R /Applications/Xcode.app/Contents/Developer/Library/Xcode/Templates/File Templates/Source/Swift\ File.xctemplate ~/Library/Developer/Xcode/Templates/[Group name]/
Смотрим что получилось
2 шаг.
$ cd ~/Library/Developer/Xcode/Templates/Custom/Swift\ File.xctemplate
$ ls
TemplateIcon.png          TemplateIcon@2x.png       TemplateInfo.plist        ___FILEBASENAME___.swift
3 шаг. Редактируем исходный файл ___FILEBASENAME___.swift
//
//  ___FILENAME___
//  ___PROJECTNAME___
//
//  Created by ___FULLUSERNAME___ on ___DATE___.
//___COPYRIGHT___
//

import UIKit
4 шаг. переименовываем папку Swift File.xctemplate -> UIKitFile
Swift: Generics (Дженерики)
Пример Generics в функции
class GenericsDemo {
    class func swap<T>(_ a: inout T,_ b: inout T){
        let temp = a
        a = b
        b = temp
    }
}

var n1 = 100
var n2 = 200

GenericsDemo.swap(&n1, &n2)

var s1 = "s1"
var s2 = "s2"

print("s1=\(s1) <-> s2=\(s2)")
GenericsDemo.swap(&s1, &s2)
print("swap\ns1=\(s1) <-> s2=\(s2)")
Genereics в типах
protocol Container {
   typealias ItemType
   mutating func append(item: ItemType)
   var count: Int { get }
   subscript(i: Int) -> ItemType { get }
}

struct TOS<T>: Container {
   // original Stack<T> implementation
   var items = [T]()
   mutating func push(item: T) {
      items.append(item)
   }

   mutating func pop() -> T {
      return items.removeLast()
   }

   // conformance to the Container protocol
   mutating func append(item: T) {
      self.push(item)
   }

   var count: Int {
      return items.count
   }

   subscript(i: Int) -> T {
      return items[i]
   }
}

var tos = TOS<String>()
tos.push("Swift")
println(tos.items)

tos.push("Generics")
println(tos.items)

tos.push("Type Parameters")
println(tos.items)

tos.push("Naming Type Parameters")
println(tos.items)
iOS: Code Injection (on runtime)

Паттерн Chain of Responsability
Цепочка обработчиков
Цепочка обязаностей, она же цепочка ответственности, она же цепочка обработчиков
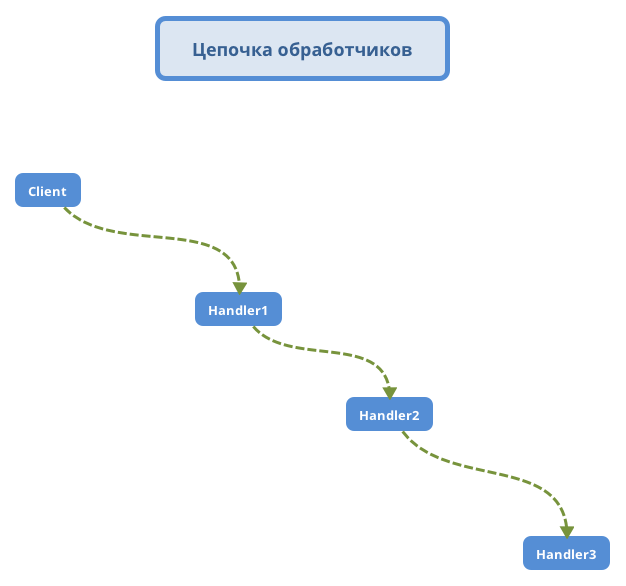
Когда использовать этот паттерн:
- У вас более чем один объект — обработчик.
- У вас есть несколько объектов обработчика, при этом вы не хотите специфицировать который объект должен обрабатывать в даный момент времени.
Цепочка обязанностей используется для обработки разнообразных запросов, каждый из которых может рассматриваться другим обработчиком.
Паттерн Fabric Method
Фабричный метод
Фабричный метод порождает объекты одного и того же типа.
import Foundation
import UIKit

// Protocol for "Product"
protocol AppleProduct {

    var name: String {get set}
    var screenSize: Double {get set}
    var price: Double {get set}

    func getProduct() -> String
}

// Protocl for "Creator"
protocol AppleProductCreator {

    func createProduct() -> AppleProduct
}

// Class for "ConcreteProduct"
class IPhoneProduct: AppleProduct {

    var name: String = "iPhone 6"
    var screenSize: Double = 4.7
    var price: Double = 199.00

    func getProduct() -> String {

        return "Apple product "(name)", with screen size in (screenSize) inch, at proce: $(price)"
    }
}

class IPadProduct: AppleProduct {

    var name: String = "iPad Air 3"
    var screenSize: Double = 10.1
    var price: Double = 499.00

    func getProduct() -> String {

        return "Apple product "(name)", with screen size in (screenSize) inch, at proce: $(price)"
    }
}

// Class for "ConcreteCreator"
class IPhoneProductCreator: AppleProductCreator {

    static let sharedInstance:IPhoneProductCreator = IPhoneProductCreator()

    func createProduct() -> AppleProduct {

        return IPhoneProduct()
    }
}

class IPadProductCreator: AppleProductCreator {

    static let sharedInstance:IPadProductCreator = IPadProductCreator()

    func createProduct() -> AppleProduct {

        return IPadProduct()
    }
}
Применение
let product1: AppleProduct = IPhoneProductCreator.sharedInstance.createProduct()
print("Got a new device: " + product1.getProduct())

let product2: AppleProduct = IPadProductCreator.sharedInstance.createProduct()
print("Got a new device: " + product2.getProduct())
Пример 2
protocol Currency {
    func symbol() -> String
    func code() -> String
}

class Euro : Currency {
    func symbol() -> String {
        return "€"
    }

    func code() -> String {
        return "EUR"
    }
}

class UnitedStatesDolar : Currency {
    func symbol() -> String {
        return "$"
    }

    func code() -> String {
        return "USD"
    }
}

enum Country {
    case unitedStates, spain, uk, greece
}

enum CurrencyFactory {
    static func currency(for country:Country) -> Currency? {

        switch country {
            case .spain, .greece :
                return Euro()
            case .unitedStates :
                return UnitedStatesDolar()
            default:
                return nil
        }

    }
}
Применение
let noCurrencyCode = "No Currency Code Available"

CurrencyFactory.currency(for: .greece)?.code() ?? noCurrencyCode
CurrencyFactory.currency(for: .spain)?.code() ?? noCurrencyCode
CurrencyFactory.currency(for: .unitedStates)?.code() ?? noCurrencyCode
CurrencyFactory.currency(for: .uk)?.code() ?? noCurrencyCode